Excel – Using Data Validation to Control Data Entry
They say that two things in life are unavoidable – tax and death. There is, however, one more you can add to the list, and that is people mucking up your spreadsheets! Send out a spreadsheet to five different people and you can guarantee you will get at least one person filling it out in some strange and obscure manner, and some bright spark won’t like your layout so they decide to re-arrange your table to suit them.
So how do you stop all of that? There are two basic things you can do:
- Apply DATA VALIDATION to your tables
- Apply varying degrees of PROTECTION to your worksheets and workbooks
Here, I am going to tackle DATA VALIDATION.
DATA VALIDATION allows you create drop down lists in cells as well as create rules that control what people can and cannot enter into a cell.
Let’s take a timesheet as an example…
Each week I want team members to fill out their own timesheet. They need to fill out all times for one week starting on a Monday through to Friday. Work is done on projects, and more specifically to tasks within a project. Time can be chargeable or non-chargeable to the project and different activities will fall into each of those categories. Team members are also required to add a justification where necessary, such as overtime. And finally, the timesheet needs to be approved by the manager.
So with all the different bits of information required, the possibilities for errors and creative form filling are endless.
A lot of this timesheet relies on specific project numbers and category descriptions. This sort of data entry is prone to errors, so use DATA VALIDATION to create drop down lists forcing users to select from a specific list of options, with no allowance for users to add their own values.
First, let’s create a list of team members so people can’t even get that wrong! Create a list (ideally on another sheet in the workbook – makes hiding the lists easier afterwards). If you want, name your list e.g Team. This is not strictly necessary if you are using Excel 2010/2013 but makes life easier and is a MUST if using 2007 or earlier if your lists are on a separate sheet from the sheet where the drop downs will be used as you cannot select cells on another sheet unless they are part of a named range.
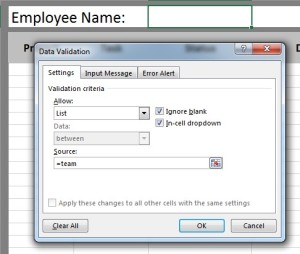
In your timesheet, click on the cell(s) that will have the drop down list. Assuming we have already created a list, go to the DATA tab and select DATA VALIDATION.
From the ALLOW options, select LIST.
In the SOURCE box use the range picker button to select the cells containing the list values, or if you have created a named range type = followed by the range name i.e. =Team (note: no speech marks).
You should now have a fully working drop down list to choose from.
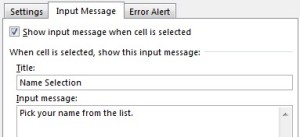
To help your team use the drop down properly, you can add an optional prompt. Go to the INPUT MESSAGE tab, add a title of some sort and a useful message to assist (rather than confuse) the users.
Click on OK to confirm. You should now see this next your cell.
You also have the option to control whether people are restricted to using only the values in the list, or whether they can type in their own values. The latter option is potentially dangerous, but this may be necessary so a good user prompt here is a plus.
Go to the ERROR ALERT tab.
Under STYLE, you have 3 options;
- Stop – limits values to those in the drop down list ONLY (Good choice!)
- Warning – warns you are about to enter a value that is not in the list and asks if you wish to continue. To which you can say ‘yes’, therefore ignoring the list completely.
- Information – even less harsh than Warning. Tells you the value you are entering is not in the list. Click on OK to ignore and continue regardless.
There may well be times when you do want to give people the option to enter other values, which is fine, but if you want to cut out any form of creativity with your spreadsheet go for STOP!
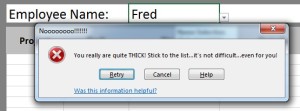
If you don’t want the standard pop up message from Excel, type in your own title and message, so if someone enters something outside the list they get a custom message;
Continue to apply drop down lists with input and error messages where appropriate.
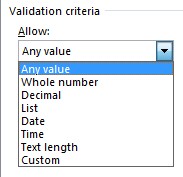
DATA VALIDATION though is not limited to just creating lists. Create rules to control any of the following:
- Whole numbers
- Decimals
- Dates
- Times
- Text length
- Custom (create your own rules using formulas)
In each case you will have a variety of options: between, greater than, less than etc. Pick an option and enter values to suit your rules.
Most of the options are self-explanatory but CUSTOM is where you can create formulas to create complex rules that may involve multiple cells. When using the CUSTOM function just be careful with your relative and absolute cell references especially when applying your validation rules to a block of cells. Although you apply the rule to a range of cells you are actually writing the formula for the first cell in the selected range and Excel copies the formula down/across to the other cells.
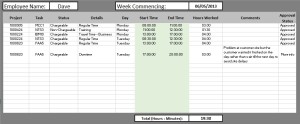
Eventually, you will get a complete timesheet looking something like this…
So that is DATA VALIDATION. We now have a working spreadsheet where users have limited options on how to fill it out. However, there are still a number of issues that need to be dealt with here to further improve the reliability of the timesheet;
- Incorrect project/task combinations
- Incorrect status/details combinations
- Late submission of the timesheet
- Authorisation access
I will cover these in “Creating Linked Validation Drop Down Lists” and “Protecting Your Workbooks”. Further enhancements could be added using VBA…so by no means a done deal yet!
Also see “Data Validation Error Checking & other useful tips”
Posted on June 5, 2013, in Data Validation and tagged data validation, drop down lists, msexcel, validation rules. Bookmark the permalink. Leave a comment.


Leave a comment
Comments 0