Monthly Archives: May 2015
MS Project – Setting Up Calendars and Working Times
Before embarking on creating a new project, one of the things you must do is set up your calendars and working times correctly. This may seem like a fairly obvious thing to do but you would be surprised how many people fail to do this correctly or even do it at all.
I train people in both MS Project and Primavera, and once on a Primavera course, the grads told me that their boss hated Primavera and insisted on writing all his plans in MSP (he knew it well, it was better yada yada….) before handing it to the grads to convert to the official business tool. On the final day of the course the delegates have to work on an existing project from their business and convert it into a Primavera project plan. The graduates on this course had been given one of their boss’s MS projects, which using their new skills, duly converted. However they found a mismatch in the duration of all the activities but could not work out why. On closer examination, it turned out that their boss had failed to correctly set the calendar and working hours, so all his projects were out and therefore not calculating things correctly, especially costs – so much for their boss being an expert!
As you can see from this story, even people who have used Project for some time still manage to get this basic step wrong.
So how do you avoid this pitfall?
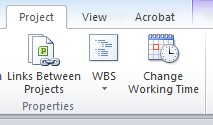
Before you even add the first task to your project go to the PROJECT tab and select CHANGE WORKING TIME from the PROPERTIES group.
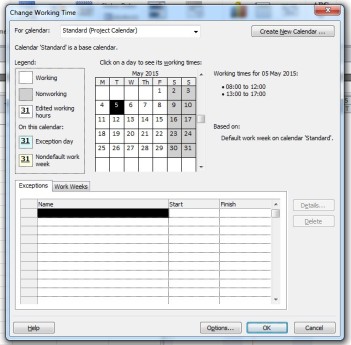
This will then open the CHANGE WORKING TIME dialog window.
The dialog window is basically split into two main areas;
- Standard calendar view
- Exceptions and work week detailed view
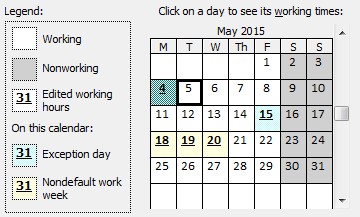
The top calendar view gives you a quick visual check of your calendar, showing days where working times are as per the default setting, which days are exceptions, which days have edited times and which are non-working. Below is an example of what you might see in the calendar. Use the key to the left of the calendar to work out which is which.
The calendar in MSP goes on way into the future. In 2010 for example, the calendar goes on until end December 2049, so you should not run out of time when planning your next project.
You should also notice that your calendar has default working times set up;
08:00 – 12:00
13:00 – 17:00
If your business operates to those hours, then you have very little to do. If however, your standard operating hours do not match this, then you’ll need to edit your hours. You can edit the STANDARD (PROJECT CALENDAR), NIGHT SHIFT calendar or create a new one.
In this example I am going to edit the standard calendar.
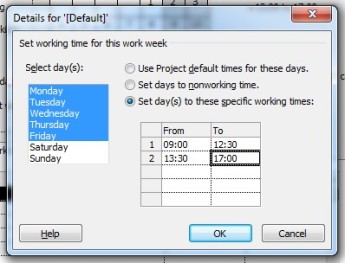
Click on the WORK WEEKS tab then click on the line showing DEFAULT, and then click on the DETAILS button.
Select the days of the week you want to set specific times for. You can set different times for each day of the week, or any combination of days by using CTRL + left click to select days, or, as is most likely, click and drag your mouse over all the working days to select them. In this example I have selected Monday to Friday. Choose SET DAY(S) TO THESE SPECIFIC WORKING TIMES and enter your specific working times in the table below. You can set up to 5 working periods in a day.
Note that setting your own default times will apply to the end of time, so there is no need to go into the next week and set that one up too. There may be a need to modify a whole week for some reason, in which case you can select the period and edit the times using the WORK WEEKS tab and changing times using the DETAILS button in the same way as described above.
Once you’ve set your standard working hours click on OK.
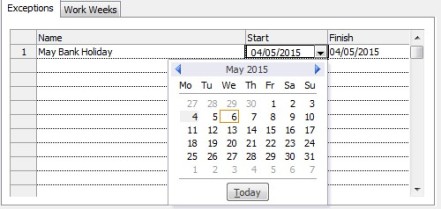
If you have any shut down dates, or national holidays etc. then select these and set them as NONWORKING days. The quickest way to do this is select the date from the calendar, then click the EXCEPTIONS tab. Give your exception a name or description, and when you click into the START and FINISH boxes the date of the selected day in the calendar should automatically show. If not, then simply use the drop down to select a date.
Now…having done all of that you would think that your calendar was fully set up and ready to use. If you have stuck to the Microsoft defaults, then no problem, but if you have changed your working hours then you could be falling into the trap that catches out so many project managers and planners alike.
Taking the working times I edited above (9:00 – 12:30, 13:30 – 17:00) this would represent a 7 hour working day. If we try inserting a two day task into our Gantt chart you will see something quite odd.
The task starts on Wednesday, yet somehow does not finish till the Friday. Logically, the task should have finished on Thursday evening, but it hasn’t. So what has happened?
The trick to solving this lies in the OPTIONS button at the bottom the CHANGE WORKING TIME dialog window.
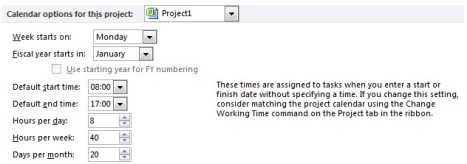
This will open the PROJECT OPTIONS window. Lurking in here are a handful of key options you need to change if you have set your own working hours.
The first few settings such as WEEK STARTS ON, FISCAL YEAR STARTS IN etc. are all self-explanatory. Where the problems start, are HOURS PER DAY, HOURS PER WEEK and DAYS PER MONTH (albeit less so with this one).
If you enter duration in your project as days or weeks, Project uses the values stored here a bit like look up values. So when I entered 2d as my duration, rather than 14 hours (2 days @ 7 hours each) Project looks in options and sees that one day is 8 hours long. Two days would therefore take 16 hours to complete. However, our working times are only 7 hours per day. Project allocates 7 hours on day 1, 7 hours on day 2 and the remaining 2 hours on day three. Project is therefore still respecting our working hours but basing its hours on a value that is incorrect.
The same applies for weeks. If I entered a duration of say 2 weeks, Project would calculate 80 hours required instead of 70. That may not seem like a lot, but start adding costs to that and resource allocations over a year and you’ll soon be quoting lots of incorrect times and costs.
Applying this to a 4 week task costing £25 per hour would give 140 hours (using the real working hours) at a cost of £3,500 compared to 160 hours (using the default hours) at a cost of £4,000. Not huge, but apply that to hundreds of tasks and with some hefty hourly rates you will be unnecessarily adding days or even weeks as well as considerable cost to the plan.
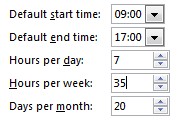
So you must change the OPTIONS to correctly reflect your edited working hours – 7 hours per day, 35 hours per week.
Days in a month is a bit trickier as this is really an average. You can by-pass this issue by simply selecting weeks which then avoids any ambiguity and will give a more accurate hourly total. You can debate that final point amongst yourselves!
If you update the OPTIONS when tasks and durations are already in the plan, these will be adjusted, but not properly and you will have to re-enter all the durations again.
By getting this right before you even add a single task will save you a lot of time avoiding having to update everything and will also ensure you have a properly working calendar for your overall project.
So next time you start a project from scratch, make sure your working hours and options are correctly set up before you do anything else. And if you are given a project plan by someone else, take a sneaky peek at their calendar and options and see if they have been properly aligned. You might be surprised to find how many have not been set correctly.

