Blog Archives
PowerPoint – 3-D Custom Shapes (Cylinders)
In a previous blog I showed you how to create a shiny sphere which you can use in a variety of ways. This time, I will show you how to create a transparent tube/cylinder.
Go to the INSERT tab and click on SHAPES. From the window that appears, click on the DONUT.

Pick out the donut
Draw a perfectly round DONUT by holding down the SHIFT key as you click and drag.

Resize the walls of your donut
The DONUT ring is quite thick and we need to reduce this a bit so we end up with the image on the right (above). To do this, click and drag the yellow grab handle towards the outside of the DONUT.
We will start with a basic cylinder for now, but I will show you how to add something inside the cylinder a bit further on.
Right click on your DONUT and select FORMAT SHAPE.
Select 3-D ROTATION, and from the presets, and from the group called PERSPECTIVE, pick the one called PERSPECTIVE RELAXED.

Perspective relaxed option
You now get something like this…

A “relaxed” donut
You can always change the perspective manually later to suit your particular requirements, but this will do for now.
At this stage we can add a little interest to the shape by adding a bevel, but it’s not absolutely necessary. If we do though, we do it by selecting the 3-D FORMAT option and selecting one of the bevel options from the TOP BEVEL button. This will give us…

“Relaxed” donut with added top bevel
Now we need to add some depth to our shape. Amongst the 3-D FORMAT options you’ll see DEPTH. Pick a colour so it matches with what will be the top of our cylinder and type in a value to give some depth to the DONUT. In this example I will set it to 250 pt.

Donut turned into a cylinder
Try out the different MATERIAL and LIGHTING options available to you as well as the ANGLE of the light to see a variety of different effects.

Using some of the material and lighting options
At this point you are thinking “well…that’s pretty…but what do I do with it?”
This is where having something in the cylinder might be of use. For instance you might want to represent profit levels, or levels of readiness for a project and want something a little more interesting than just 50% written across the screen.
Start off exactly as we did before to create the empty cylinder but this time add in a coloured CIRCLE inside the DONUT. Once you’ve done that, GROUP the two shapes together. Continue as above adding bevels and depth to the grouped shape. You should now have something like this…

Cylinder with “filling”
At the moment our contents “fill” the cylinder. We can adjust this level to whatever we want to give the impression of different values i.e. 75%, 50% etc.
Click TWICE (not a double click) to select the “filling”. Change the DEPTH to whatever level you want to show. Here, I will set it to 125 pt (or 50% of the full cylinder).

Filling adjusted to 50%
Problem is, the DEPTH varies starting from the top, not the bottom which would make more sense. To lower the “filling” go to 3-D ROTATION and go to the setting DISTANCE FROM GROUND. Enter a NEGATIVE value until you hit the bottom of the cylinder.
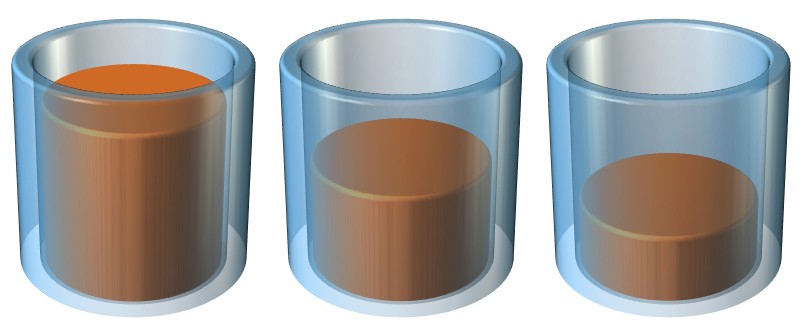
Three transparent cylinders showing three different fill levels
Apply different values to your “filling” to represent different values as I have done in the example above. I have also changed the perspective slightly to give a better view of the levels in each cylinder.
So with a few simple techniques you can create your own custom 3-D shapes that represent your data in a more visually interesting way than just a handful of bullets with numbers, and you don’t have to go and buy some random stock photo that doesn’t really show what you want the way you imagined it.
PowerPoint – Creating Custom Graphics (Shiny Spheres)
Although there are lots of images you can download or copy from a variety of sources, sometimes you can’t find exactly what you want. The only way to get around this is to create your own custom shapes and images.
Although PowerPoint won’t ever have the functionality of Adobe Illustrator or Photoshop, with a handful of tricks you can create some fairly neat graphics to spruce up your presentations rather than stick to usual set of clip art or shapes available to you in the standard menu.
How about creating something like this…

What we are aiming to create…
Ok…a shiny sphere…what use is that? Let’s not forget that PowerPoint is there as an aid to presenting, not the presenter. Using abstract images or graphics can help to convey a message across rather than ram it down your throat. The explanation of the graphics is down to the presenter – after all it’s the presenter that the audience has come to listen to, not read page after page of bullet points (yawn!!).
So how do we create this marvel? I will show you two methods: one quick and simple, the other more involved and gives you more control over the end effect.
Method 1 – the more involved method:
From the INSERT tab, select SHAPES and select the OVAL from the BASIC shapes section. Note that circles are not an option in Microsoft drawing tools.

Selecting OVAL to create a circle
To create a perfect circle hold down the SHIFT key while you drag the cursor, otherwise all you get is as the shape name suggests, an OVAL.
From the FORMAT tab go to SHAPE OUTLINE and remove the OUTLINE to your circle.

Remove the outline to a shape
Next we need to fill the circle with a GRADIENT FILL. Right click on the circle and select FORMAT SHAPE.
Then make the following settings:

- Select GRADIENT FILL
- Set the TYPE to RADIAL
- Set DIRECTION to FROM CENTER
- Make sure you only have 2 GRADIENT STOPS. Set a light colour at 0% (far left) and a dark colour at 70%. In this example I have used Blue-Grey, Text 2, Lighter 80% for the lighter colour and Blue-Grey, Text 2, Darker 50% for the darker colour. You can of course whatever combination you want.
I am using PowerPoint 2013 here but the same settings can be achieved in earlier versions too.
Now add a second smaller OVAL/CIRCLE on top of your first circle. You can use either a circle or an oval, your choice, whichever you think looks best. I will add an oval in this example.
Again you will need to apply similar settings to your first circle…no outline, gradient fill etc. but this time with slightly different setting on the GRADIENT FILL.

Settings for the smaller sphere
- Set the TYPE to LINEAR
- Set DIRECTION to LINEAR DOWN
- Set the first stop (far left) to WHITE and use the same dark colour as before for stop 2 but this time set it to 80-85%
- Set TRANSPARENCY to 100%
The final step is to add a SHADOW under the sphere.
Click on the main circle (you don’t want to create a shadow for the smaller one), then right click and select FORMAT SHAPE again, but this time pick the EFFECTS section and select SHADOW. Go for any setting you like. In this example I have used the following settings:

Shadow settings for your sphere
Method 2 – the quick and easy way:
Create your circle, removing any shape outline, exactly as outlined in the steps above.
On the FORMAT tab look at the SIZE of your circle and make a note of the size shown.

Size of your shape
Now right click on your circle and select FORMAT SHAPE. Go to 3-D FORMAT and set both the TOP and BOTTOM BEVEL to ROUND.

Bevel setting
You now need to set the WIDTH and HEIGHT values. To set this correctly and quickly, you’ll need the size of the circle you created. To calculate the correct values for your circle you have to do a quick calculation;
- If working in centimetres – diameter x 14
- If working in inches – diameter x 36
Apply the calculated number to width and height for both top and bottom bevels. So using my example here, the values would need to be set to 9.22 x 14 (my laptop works off metric measurements) to give a value of 129.08, which I have rounded down to 129.
The end result then looks like this;

Quick sphere
This gives a perfectly acceptable result and creates a complete sphere that you can rotate which changes the lighting slightly across the surface.
Whichever method you choose to use, you can create as many of these as you like in any colour you like to match your presentation theme.

Spheres in various colours. With a bit of added animation you can turn these into a Newton’s cradle!
How you then choose to design your own graphics is entirely up to you and the message you are trying to get across to your audience.

Using spheres with some added 3-D images
Although this sort of thing takes time, the end result is worth it, and with practice it takes less time, and ultimately you can move away from the standard dull/unimaginative bullet point/clip art type presentation that send people into a presentation weary comatose state. Even if they don’t think the topic is interesting, at least they might show some interest in your amazing graphics!
Now go and get creative.
