Blog Archives
PowerPoint – Working with Photos
Far too often people don’t take advantage of PowerPoint’s image features and stick with slide after slide of bullet points and overly complex charts (if you want a laugh about how not to use PowerPoint, then follow this link to the comedy stand up routine by Don McMillan – “Life after death by PowerPoint 2010” https://www.youtube.com/watch?v=KbSPPFYxx3o ).
If you want a master class in presenting, then watch Steve Jobs and the minimalist approach he had, using simple images to act as a backdrop to his verbal presentation and yet this would be enough to hold his audience and have the desired impact.
So working with images is a good way to do it, but not all of us have a library of professional presentation images to hand. This means you are probably not that keen to add images that have distracting backgrounds or feel that putting up 20 6 x 4 snapshots is not really inspiring.
So what does PowerPoint have in the way of tools to help us make the most of our images?
In this blog, I will be using PowerPoint 2013 so some of the features may not exist in some of the earlier versions, or similar results can be achieved but not as simply.
The things I will be showing you are;
- Inserting images
- Applying image corrections
- Applying colour effects
- Applying artistic effects
- Compressing image size
- Applying styles
- Image cropping
- Removing image backgrounds
- Converting images into SmartArt
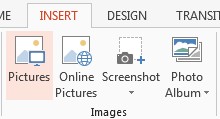
First the really easy bit – inserting images. Go to the INSERT tab and click on PICTURES in the IMAGES group.
Browse for images on your PC or laptop select one or more images and click on INSERT.
The picture(s) may need to be resized depending on their original size. Remember to hold the SHIFT key down when you resize an image to maintain the aspect ratio i.e. keep the sides in the same proportions and don’t distort the picture. Alternatively, go to the FORMAT tab and click on the arrow in the bottom right hand corner of the SIZE group and set the dimensions in the dialog box that appears.
Now you can adjust, modify, crop and generally change your picture completely within PowerPoint.
Corrections
In case your picture isn’t picture perfect you can make some basic corrections like sharpening or softening the image or alter the brightness levels. These are all presets so you will not have the same level of control as you would in Photoshop. But for a quick fix…not bad.
Color
Here’s where you can unleash your inner Andy Warhol. Pick from a range of settings to alter the colours within your picture.
If you find the preset option limited, then click on the further options at the bottom of the COLOR window.
Artistic Effects
Another set of ready-made effects for you to apply to your images, and once again there are additional option at the bottom of the ARTISTIC EFFECTS window should you need them.
Both the COLOR and ARTISTIC EFFECTS options are things you can easily play with, experimenting with various combinations to see what sort of interesting effects you can create. Perhaps not the most useful thing when preparing a business presentation, but fun.
What will be of use, is the ability to compress images.
Compress Pictures
Digital photos are getting bigger and bigger in terms of file size. Most of my photos are around the 6-8Mb size (I dread to think what size they would end up if I shot photos in RAW mode) and if I then adjust the images in Photoshop the size can increase dramatically.
Chance are your company has a limit on file size you can send on e-mail so a presentation with 10-20 full size images soon becomes a problem. So it’s time to compress your images.
In your ADJUST group on the FORMAT tab, click on COMPRESS PICTURES. From the dialog box, select from the options available and reduce the overall size of your presentation allowing you to send it out by mail.
Applying Styles
Add frames, faded edges, reflections etc. to your images. Another fun feature to play with to try and make your images that little bit more interesting.
Cropping Images
Sometimes you don’t need all of the image, or perhaps there is something in it that you don’t like or want. So you can crop any part of an image and the nice thing is that once you have cropped an image you can save it as a new image to reuse again elsewhere.
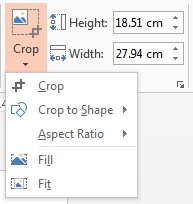
Within CROP you have a number of options, from a basic crop, to fitting your image inside one of the standard SHAPES, cropping to a specific height/width ratio or filling a slide.
To crop a picture click and drag the black grab handles until you get the desired part of the image.
Once cropped, right click on the new image and if you want select the option SAVE AS PICTURE in case you want to reuse the cropped image rather than to go through the whole process again.
Removing Image Backgrounds
This is quite a neat feature. It’s nowhere near as good as Photoshop but it does a pretty good job, especially where you have a plain background that can be easily detected against the part of the image you want to cut out.
Let’s take an example;
I have a picture of me and I want to add it to a slide. OK, no problem there, but the image has a lot of white background which looks a bit messy with a coloured background to my slide.
Ideally I just want a cut out of me without the background so it looks more like it is part of the slide rather than just an image plonked on top.
Select the image and click on REMOVE BACKGROUND on the FORMAT tab.
It tries to work out what you are trying to cut out, and where it gets it wrong you can use the drag handles to extend the selection.
Even after extending it may not include everything you want. See the image below where it has failed to include the bottom of the right hand sleeve and my trousers.
BACKGROUND REMOVAL has its own ribbon and you have the option to MARK AREAS TO KEEP and MARK AREAS TO REMOVE. This may get trickier if you have a busy background rather than a plain one similar to this example.
Click on the area(s) you want to keep or remove until you get you want.
Click on KEEP CHANGES and you then get this;
Not a bad job. If you want to be picky, do the same exercise in Photoshop and see the difference. It’s really at the edges where you see the main difference, especially with hair (and I don’t have much) but you can see the individual hairs on the Photoshop cut out, but they are lost in the PowerPoint one (doesn’t make much difference on my head you might say!) but as I mentioned before, this is being picky and for a presentation, this should be good enough.
Convert Images Into SmarArt
You probably know you can convert boring bullet points into SmartArt…well, you can do the same with images.
Import a bunch of photos…don’t even bother resizing them on your slide.
Go to the PICTURE LAYOUT option in the PICTURE STYLES group of the FORMAT tab.
Pick any layout you like the look of and PowerPoint will rearrange your images into that layout, resizing/cropping photos to fit automatically.
Note: to get the island picture as the main one, it needed to be moved to the back of the stack of images to effectively make it the first picture chosen.
So now when you want to add images to a presentation you are no longer limited to basic image display, you can crop, alter, cut out and present them in interesting layouts. Ultimately, banish those boring bullet points forever, give your viewers something interesting to look at and listen to what you have to say.
Happy presenting!


